

Main Facts
- Game Silent Hill: Townfall
- Developer/Publisher: Konami
- Milestone: The climax of Part 6
- Key Objective: Navigating to the Auxiliary Room, retrieving the command centre floppy disk, and correctly positioning the pipe levers to open the auxiliary lines.
- Critical Codes & Solutions:
- Command Centre Door Code: 0825
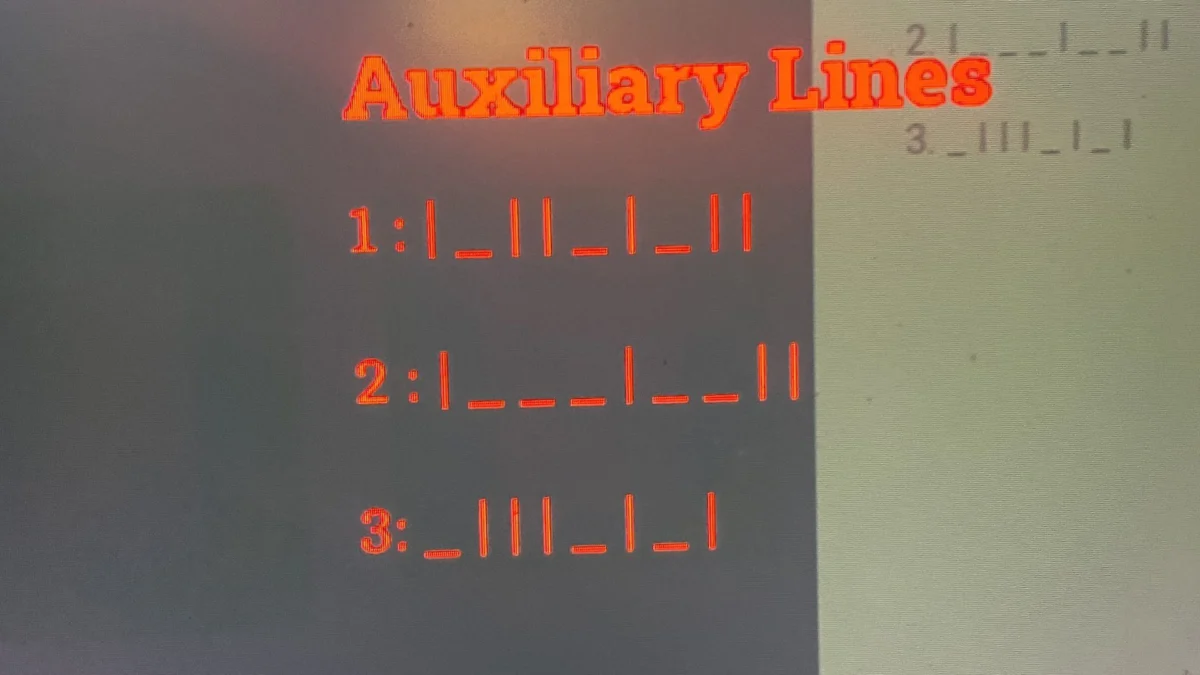
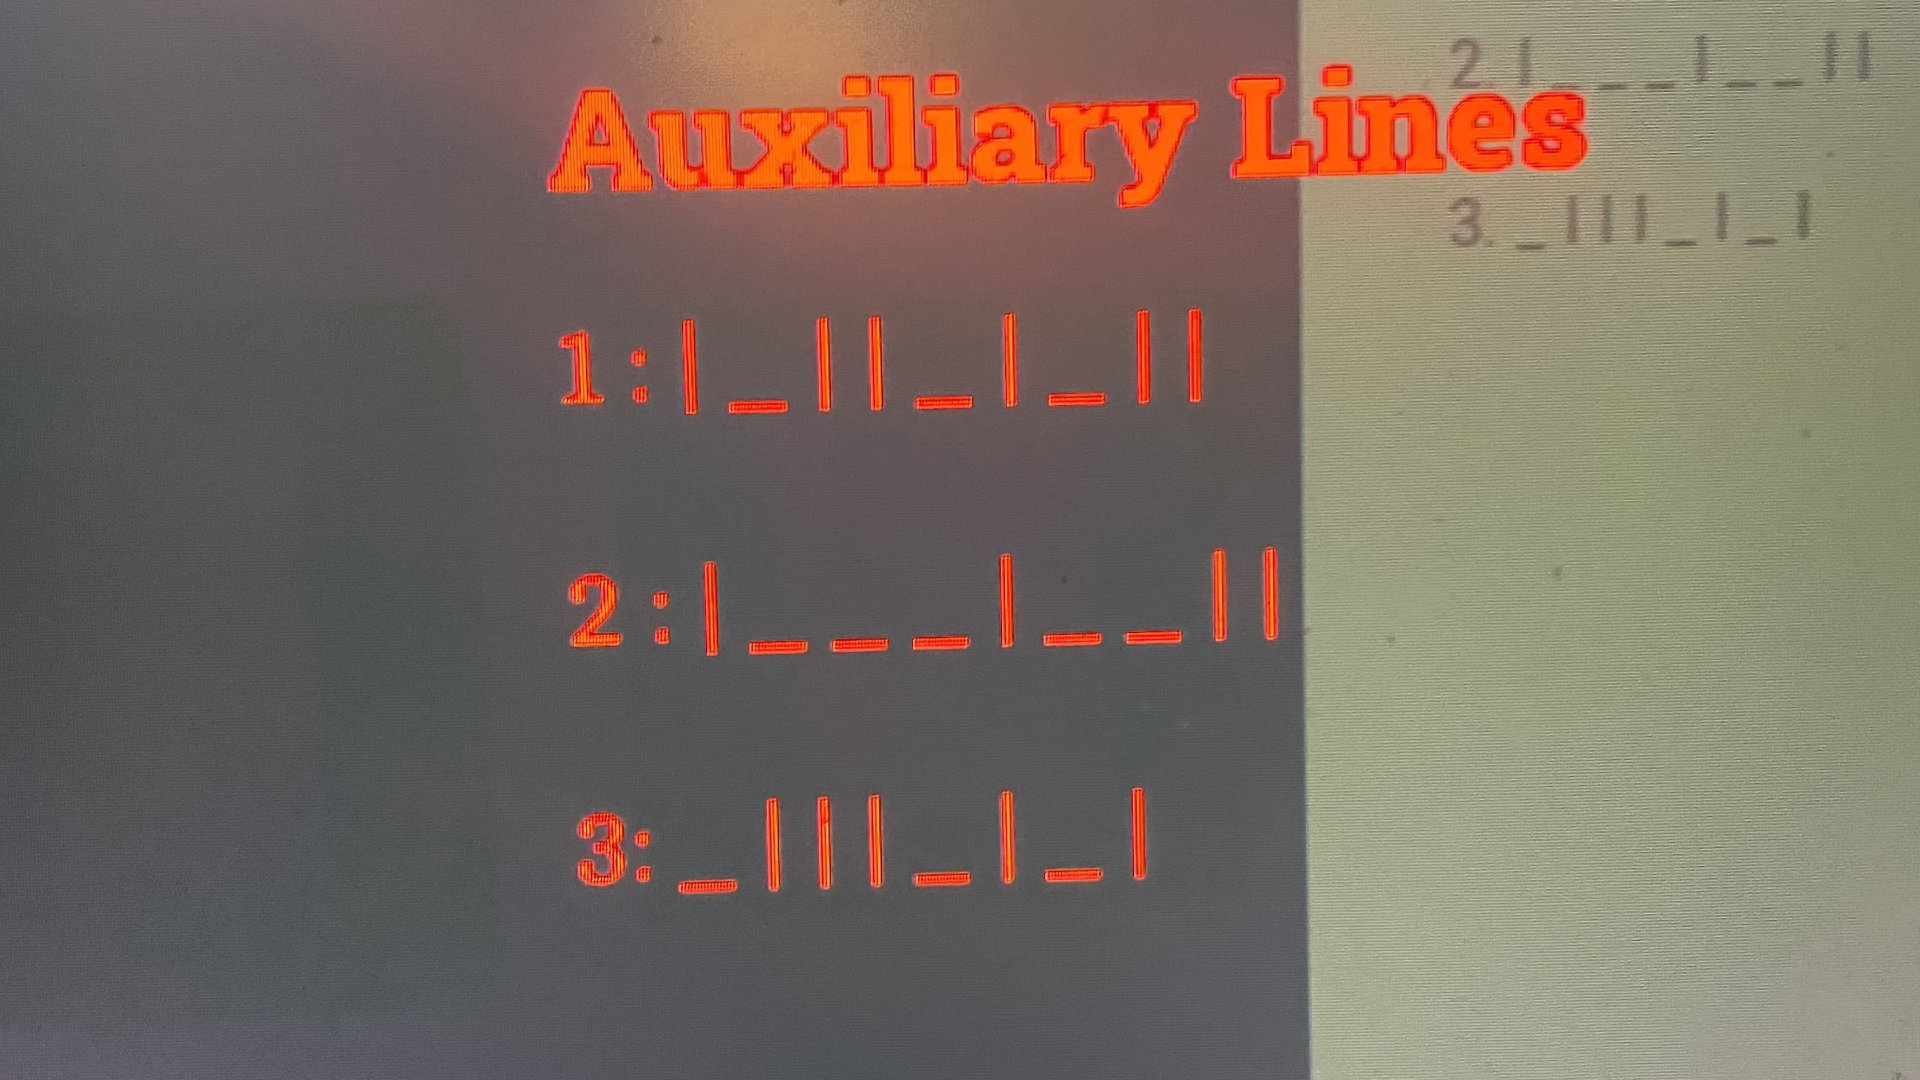
- Auxiliary Line 1 Solution:
| _ | | _ | _ | | - Auxiliary Line 2 Solution:
| _ _ _ | _ _ | | - Auxiliary Line 3 Solution:
_ | | | _ | _ |
Chronology of Events: From Command Centre to the Auxiliary Room
Reaching the end of Part 6 in Silent Hill: Townfall is a true test of endurance. By this juncture of the psychological horror title, players have been subjected to relentless tension, resource scarcity, and psychological dread. The final hurdle of this section—opening the auxiliary lines—demands a clear head when players feel least equipped to provide one.
Here is the step-by-step chronological breakdown required to navigate this harrowing sequence safely and efficiently.

Step 1: Securing Access to the Auxiliary Room
Before even thinking about touching the piping network, players must acquire the key to the auxiliary room.
- Locate the Command Centre: Navigate through the harrowing, monster-infested corridors until you reach the command centre entrance.
- Input the Security Code: Access the keypad and enter the four-digit code 0825.
- Retrieve the Key: Once inside the safety of the command centre, search the desk to secure the auxiliary room key.
Step 2: Running the Gauntlet to the Elevator
With the key in hand, the descent to the lower levels begins. However, Konami’s design ensures that success is never handed over freely.

- The Threats: The terrifying entity known as "The Weight," alongside several lesser stalker-type monsters, roams the corridors between the command centre and the elevator bank.
- The Strategy: Stealth is ideal, but given the layout and proximity of pursuers, a high-stakes "mercy dash" is often required. Sprint directly for the elevator doors. Because the mechanism closes quickly, timing is tight. Slip through the threshold just as the doors seal shut to find temporary sanctuary.
Step 3: Entering the Auxiliary Room
Upon arriving at the designated floor, players will encounter a few smaller-tier hostiles. These can be easily circumvented by keeping to the shadows and maintaining silent movement.
- Locate the auxiliary room door, unlock it using the key retrieved earlier, step inside, and immediately close the door behind you to secure your perimeter.
Supporting Data & Mechanics: Cracking the Auxiliary Lines Puzzle
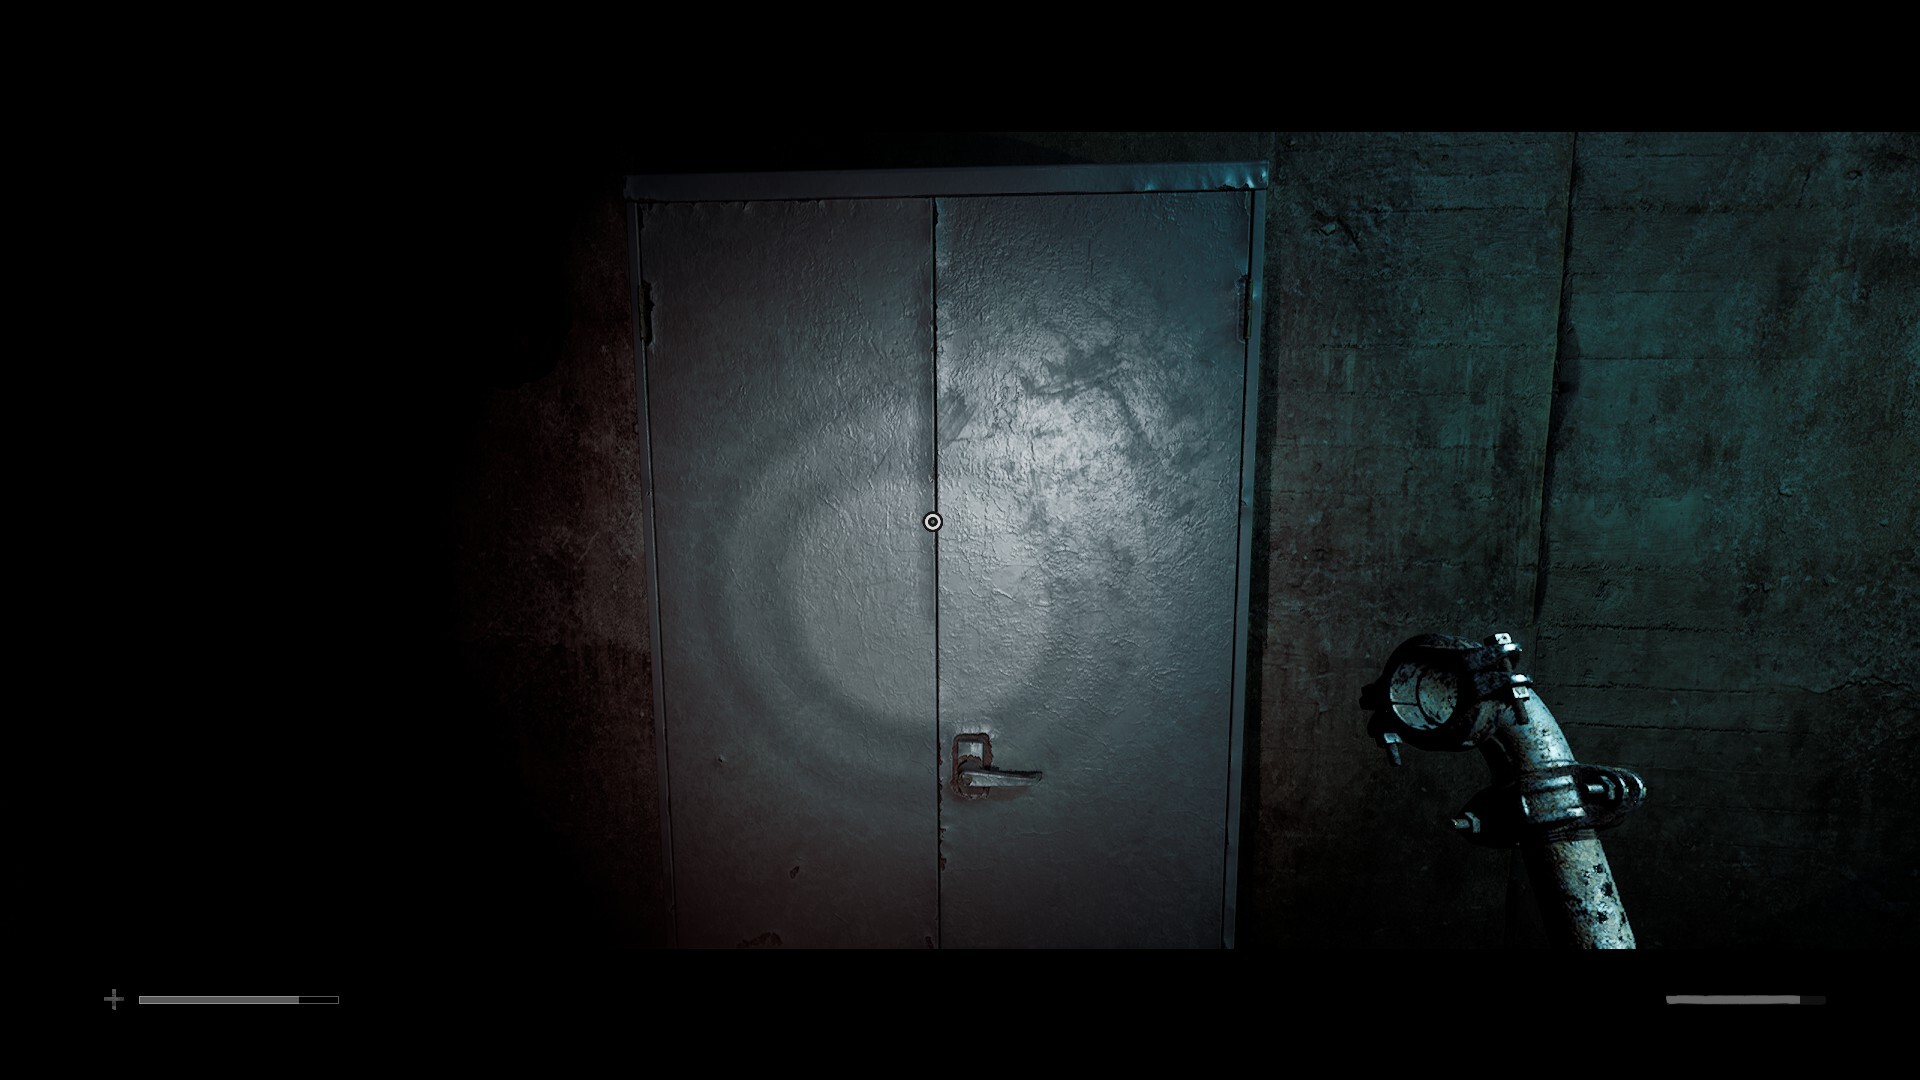
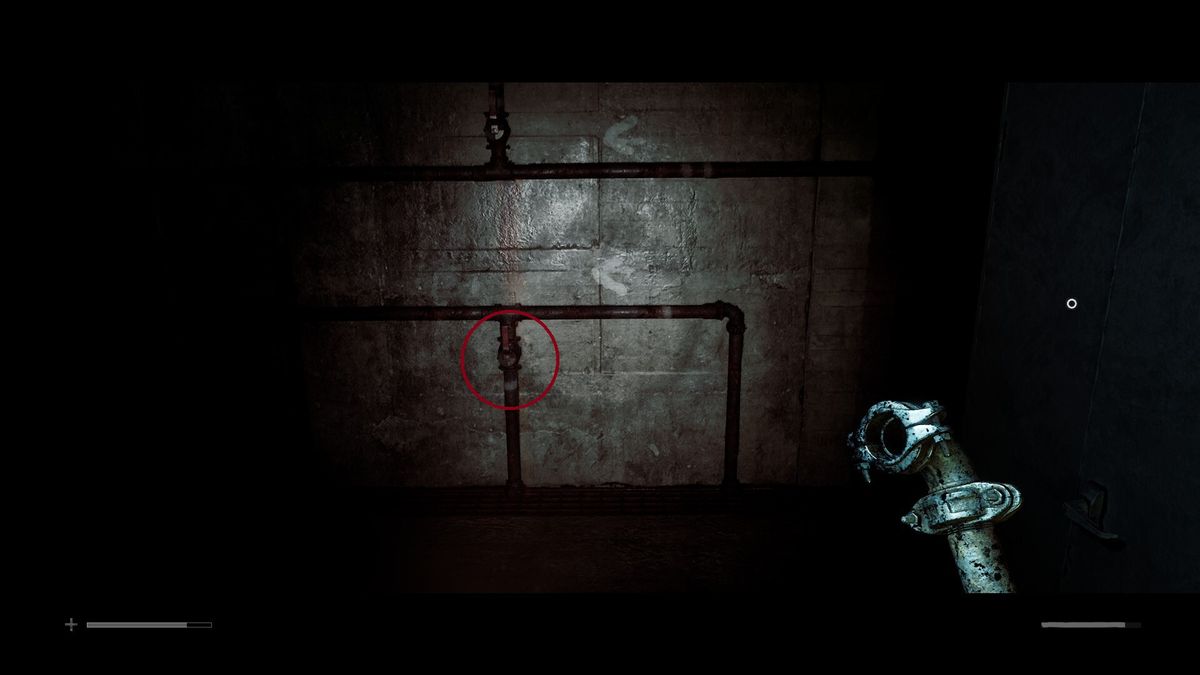
Once inside the relative safety of the auxiliary room, players are confronted with an industrial workspace featuring a locker, a desk terminal, and a complex system of pipes running horizontally and vertically across the walls, punctuated by mechanical levers at regular intervals.
The Floppy Disk Clue
- Search the Locker: Open the metal locker in the room to find a hidden floppy disk.
- Access the Terminal: Take the floppy disk to the desk terminal and interface with the system. The screen will display a series of digital lines.
- Pro-Tip for Navigation: To save your sanity and avoid constant back-and-forth trips to the monitor, take a photo of the document displayed on the terminal using your real-world smartphone for instant, stress-free reference.
Deciphering the Riddle
At first glance, the pattern of lines resembles a coded cipher or primitive Morse code. In reality, the puzzle operates on a much more straightforward spatial logic:
- The lines dictate whether specific levers must be positioned horizontally (
_) or vertically (|). - Crucially, not every lever on the wall is interactive or relevant. Players must only adjust the levers that correspond to specific rows marked by white alignment lines on the piping:
- First Row: Levers adjacent to one white line.
- Second Row: Levers adjacent to two white lines.
- Third Row: Levers adjacent to three white lines.
Detailed Lever Solutions
Auxiliary Line 1
- Starting Point: The wall next to the locker, marked by the white arrow at the bottom of the wall. This sequence controls the levers paired with the single white line markers.
- Solution Pattern:
| _ | | _ | _ | | - Confirmation: Upon correctly setting each lever in this sequence, the small indicator light directly beside the final lever will flash green.
Auxiliary Line 2
- Starting Point: The wall section next to the locker near the middle white arrow. This sequence governs the second tier of pipes.
- Solution Pattern:
| _ _ _ | _ _ | | - Confirmation: Just as with the first line, successfully mirroring the terminal’s instructions will turn the corresponding indicator light green.
Auxiliary Line 3
- Starting Point: Unlike the first two, the third line begins on the opposite wall, positioned directly above the second indicator light that just turned green.
- Solution Pattern:
_ | | | _ | _ | - Confirmation: Once the final lever is locked into place, the last system light turns green, signifying the complete activation of the auxiliary lines.
Official Responses and Developer Context
While Konami has maintained a tightly controlled information ecosystem regarding the deep narrative lore and secret mechanics of Silent Hill: Townfall, puzzle design philosophies in the modern survival horror revival heavily emphasize environmental storytelling and tactile interaction.
Developers from the publishing umbrella have previously noted that puzzles within the Silent Hill universe are designed not merely as roadblocks, but as reflections of the protagonist’s psychological state. The frantic nature of the Part 6 auxiliary puzzle—combining auditory cues of lingering monsters outside the door with abstract mechanical logic—is an intentional design choice aimed at eroding the player’s sense of safety, even inside a locked room.
Implications for the Broader Experience
Solving the auxiliary lines puzzle is more than just a momentary brain-teaser; it serves as a critical narrative and gameplay pivot point in Silent Hill: Townfall.
- Resource Management: Players who expend too much ammunition or health trying to fight off "The Weight" and hallway stalkers prior to reaching the auxiliary room will find themselves severely disadvantaged. The puzzle forces players to prioritize evasion over confrontation.
- Pacing and Tension: By trapping the player in a confined space with a logic puzzle while audio cues hint at roaming horrors just outside the thin metal door, the sequence masterfully sustains the psychological dread that defines the survival horror genre.
- Path Forward: With the auxiliary lines successfully powered, the path opens for the final push of the chapter. Players must retrace their steps through the elevator shaft, meticulously managing their stealth parameters to avoid lingering monstrosities, before returning to the command centre to close out Part 6.
For those navigating the fog-drenched corridors of Silent Hill: Townfall, patience, a sharp eye for environmental details, and a quick smartphone photo of the terminal screen remain the ultimate tools for survival.

