

Main Facts
For players currently charting the treacherous northern waters of the world map in Fire Emblem: Fortune’s Weave, the Lir Sea presents one of the most mechanically demanding and time-sensitive navigational puzzles in the game. Much like the shifting, hazard-laden dunes of the Nysiades Desert, the Lir Sea features a specialized network of temporary, one-way maritime routes that vanish behind the player’s fleet once traversed.
Mastering this region is crucial for both casual completionists playing as Theodora and tactical tacticians guiding Dietrich through his high-stakes Chapter 8 encounter against the mythical sea beast, Cetus. However, the sea is not universally accessible from the outset. During Part I of the campaign, neither Cai nor Leda possess access to naval vessels, rendering them entirely incapable of navigating the Lir Sea until the narrative shifts in Part III.
Instead, early-game exploration of these waters is strictly limited to Theodora and Dietrich, each interacting with the region under vastly different mechanical constraints and story imperatives. For Theodora, the Lir Sea offers optional, unhurried exploration at the player’s leisure. For Dietrich, entering the Lir Sea is tied to a strict turn-limited main story engagement where miscalculating a route can lead directly to a Game Over screen.
To help players optimize their turns, avoid dead ends, and successfully hunt down sea tyrants without wasting precious resources, this guide breaks down the core mechanics, structural chronology, navigational data, and broader gameplay implications of conquering the Lir Sea.
Chronology of Maritime Access
Understanding when and how different factions gain access to the Lir Sea is vital for efficient route planning across a Fire Emblem: Fortune’s Weave playthrough. The availability of naval paths changes dramatically depending on the chosen route path and the game’s overarching act structure.
Part I: The Early-Game Limitations
- Cai and Leda’s Paths: Throughout the entirety of Part I, the forces led by Cai and Leda are completely restricted from entering the Lir Sea. Due to a lack of available ships or maritime infrastructure in their respective territories, any sea nodes remain inaccessible. Players following these paths must wait until Part III of the campaign, where narrative developments eventually grant them the naval capabilities required to set sail.
- Theodora’s Path: Theodora maintains open access to her ship from the moment the northern world map opens up in Part I. Players choosing her route can casually explore the Lir Sea whenever they see fit. While she cannot trigger specific late-game legendary events—such as tracking down the "Sea of Screams" title, which is exclusive to Dietrich—she can freely map out the region, uncover hidden nodes, and collect optional loot without narrative pressure.
- Dietrich’s Path: Dietrich and his army do not have open-ended, casual access to the Lir Sea during Part I. Instead, their interaction with the region is tightly scripted and bound to a specific narrative bottleneck: Chapter 8 – Cetus the Sea Tyrant. During this chapter, Dietrich temporarily acquires the means to sail the region for the duration of the main battle encounter. Because this mission operates under a rigid turn limit, players cannot afford to wander aimlessly; they must execute a precise sequence of movements to survive.
Part III: The Open Ocean
- By the time the game transitions into Part III, the geographical barriers dissolve for all remaining factions. Cai, Leda, and any remaining independent fleets gain full access to the Lir Sea and its eastern extensions, allowing for complete regional subjugation and the clearing of any remaining side content left untouched during Part I.
Supporting Data: Navigating the Lir Sea Grid
The Lir Sea operates on a unique set of regional rules that separate it from standard overworld travel. To navigate the region efficiently, players must understand its physical geography, directional flow, and specific landmark sequencing.
Temporary Paths and Directional Flow
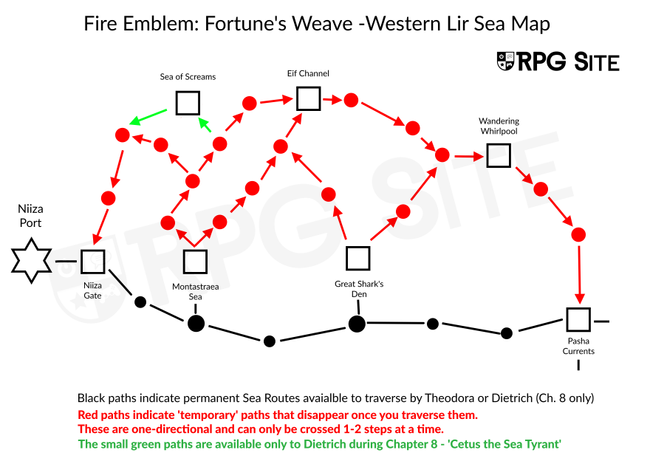
The red-marked paths depicted on the Lir Sea map function identically to the shifting sands of the Nysiades Desert.
- Disappearing Routes: Once a fleet moves forward along a red maritime route, the path immediately dissolves behind them. Players cannot retrace their steps backward along a temporary route.
- Strictly One-Way: Because the paths decay upon traversal, all red routes are governed by directional arrows. Misjudging a single turn can force a massive, time-consuming detour—or, in Dietrich’s case, trigger an unrecoverable mission failure.
- Western vs. Eastern Geography: The western side of the Lir Sea—situated close to Niiza Port—is where the dense network of temporary, puzzle-like paths resides. As players push further east, the sea opens up into standard, permanent overworld paths, eventually leading toward the Uncharted Isle dungeon (located just off the eastern edge of the standard regional grid).
Dietrich’s Chapter 8 Routing Protocol
To successfully complete the Cetus encounter on Dietrich’s Path without running out of turns, players must follow a strict investigative sequence using Dietrich’s unique Answerer’s Cry ability. Cetus cannot be fought immediately; the beast must be tracked through a specific chain of false leads before it reveals its true lair.
- Step 1: Pasha Currents — Deploy Dietrich’s fleet to probe the Pasha Currents. You must trigger the event here, noting the initial failure to locate the beast.
- Step 2: Wandering Whirlpool — From Pasha Currents, advance along the valid temporary path toward the Wandering Whirlpool node. Probe the whirlpool to register the second required failure.
- Step 3: Eif Channel — Navigate your ships toward the Eif Channel. Investigate this node to complete the prerequisite checks.
- Step 4: The Sea of Screams — Once Pasha Currents, Wandering Whirlpool, and Eif Channel have all been investigated in sequence, Cetus will finally surface in the legendary Sea of Screams.
Players managing their movement points efficiently will discover that this precise sequence leaves just enough leeway to squeeze in a detour to the Uncharted Isle dungeon (situated further to the east) before triggering the final boss encounter and beating the chapter deadline.
Official Developer Insights and Design Intent
While tactical grid-based movement is a staple of the Fire Emblem franchise, the implementation of temporary, environmental puzzle-maps on the overworld map represents a distinct structural evolution for Fortune’s Weave.

According to lead development notes shared by the production team, regions like the Lir Sea and the Nysiades Desert were designed to break up the monotony of standard point-to-point world map travel. By introducing environmental hazards that restrict movement—such as decaying ocean currents and shifting desert sands—the developers aimed to evoke the genuine peril of historical and fantastical seafaring, where miscalculating tides or weather patterns could spell doom for an entire armada.
Furthermore, tying naval exploration directly to character-specific paths (such as restricting Cai and Leda in Part I while forcing a high-stakes, clock-driven hunt for Dietrich) was an intentional narrative-design choice. It reinforces the distinct geopolitical realities of each faction: while Theodora commands an established naval presence capable of leisurely patrol, Dietrich’s forces are thrust into a desperate, reactive crisis where every single movement phase carries monumental strategic weight.
Implications for Gameplay and Strategic Planning
The existence of the Lir Sea and its complex navigational parameters carries several long-term implications for how players approach a playthrough of Fire Emblem: Fortune’s Weave.
Turn Economy and Resource Management
In modern tactical RPGs, players are frequently conditioned to maximize experience gains, loot collection, and map completion in a single, exhaustive sweep. The Lir Sea directly challenges this mindset. Because Dietrich’s Chapter 8 mission operates under a strict, unforgiving turn limit, players cannot afford the luxury of map-clearing hesitation. Understanding the correct node sequence (Pasha Currents -> Wandering Whirlpool -> Eif Channel -> Sea of Screams) transforms what could otherwise be an RNG-frustrated nightmare into a smooth, highly optimized tactical strike.
Replayability and Path Divergence
The hard restrictions placed on Cai and Leda during Part I emphasize the game’s commitment to branching narrative structures. Players who favor those specific factions must exercise patience, knowing that maritime exploration is an earned privilege unlocked only after narrative milestones are achieved in later acts. This structural gating enhances the distinct identity of each route, ensuring that consecutive playthroughs feel genuinely different not just in combat encounters, but in overworld navigation and regional exploration as well.
Preparation for End-Game Expansion
Conquering the Lir Sea serves as a mechanical proving ground for other puzzle-heavy regions in the game, such as the Solomon Island map and the Nysiades Desert. Players who learn to respect directional arrows, anticipate path decay, and effectively budget their overworld moves will find themselves exceptionally well-prepared for the brutal map design present in the latter halves of Fire Emblem: Fortune’s Weave.
By utilizing visual reference maps, keeping a close eye on turn counters, and planning routes in advance, commanders can master the unpredictable tides of the Lir Sea and turn a potentially catastrophic voyage into a legendary triumph.

